MyChild6 Install & Configuration
- Install
- Deployment Without Docker
- Deployment using Docker Desktop / Docker CLI
- Microsoft SQL Server Deployment Guide
- Microsoft SQL Management Studio Deployment Guide
- RabbitMQ Deployment Guide
- Deploying the Relay Controller without Docker
- Installing the MyChild6 Desktop Application
- Configuration
- Microsoft SQL Server Configuration
- RabbitMQ Configuration Guide
- Web Configuration
- McLinkAgent Configuration
- Simulator Configuration
- Relay Controller Application Settings Guide
- Relay Controller Adding Relays and Rules
- Configure Nginx as SSL Reverse Proxy
- MyChild6 Desktop App Configuration
- Updates / Upgrades
- Troubleshooting
- McLinkAgent won't stay running
- Tag In Field (Door Open or Closed) is delayed
- RabbitMQ using large amount of hard disk space
- Facility Configuration and Set Up
Install
Deployment Without Docker
Required Software:
- Windows Server 2019 or newer (Windows Server 2022 preferred)
- .NET 8 Runtime
Required Services:
- Microsoft SQL Server 2019 or newer
- RabbitMQ 4.2x
Optional Software/Services:
- Redis
- InfluxDb
This guide assumes you are working with a new install of windows server and the client has not provided any of the services needed by MyChild6
File Install
Start by installing the following software in the order they are listed below
- Chocolatey - Install Guide
- Microsoft SQL Server - Install Guide
- SQL Management studio - Install Guide
- RabbitMQ - Install Guide
- .NET 6 Runtime (download here)
Once all of the software dependencies are deployed, you can then start deploying the MyChild6 software.
1. Download the deployment zip file to the server (This can be downloaded from Gitlab currently)
2. Unzip the deployment zip file to c:\temp
3. Create the main program directory C:\Program Files\McRoberts Technologies\MyChild6_Web
4. Create the main directory for the McLink Agent (If required) C:\Program Files\McRoberts Technologies\MyChild6_McLinkAgent
5. Copy all files from the unzipped deployment file to the folder created in step 3
At this point the MyChild6 software is now deployed.
The next step is to install the MyChild6 Services. Follow the steps below.
Service Install
Inside the main service folder (IE: C:\path\to\MyChild6_Web\helper_scripts\installers for MyChild6) there should be a file named "install-service.ps1" this is a PowerShell script that should install the MyChild6 Web Service, to run it you will need to move the file to the same folder as the MSTWatch.Web.exe file (IE: the folder created in Step 3 above), once completed you can then double click on the file using windows explorer, or you can run the script from an Elevated PowerShell (IE: Run as Administrator).
The McLink Agent service should also have an installer file name "install-mclinkagent-service.ps1" that behaves exactly the same way as the MyChild6 Web Installer, you will find it in the C:\path\from\step\4\helper_scripts\installers copy it to the path from step 4 and execute it by double clicking on it, or running it from an Elevated PowerShell (IE: Run as Administrator).
Now you have successfully deployed the MyChild6 software to your server.
The next step is to configure and start the services. Please visit the Configuration guide for more information
Deployment using Docker Desktop / Docker CLI
Microsoft SQL Server Deployment Guide
Finding the Installer
To begin this installation please navigate to the File Explorer on the server in question by either selecting the File Explorer icon on the Task Bar as shown below:
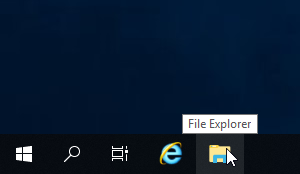
Or by right clicking the Start Menu (Windows icon) on the task bar as shown below:

You will then need to navigate to This PC (Found in the Quick Access Menu on the left in the File Explorer) > Local Disk (C:) >temp
Or C:\temp.
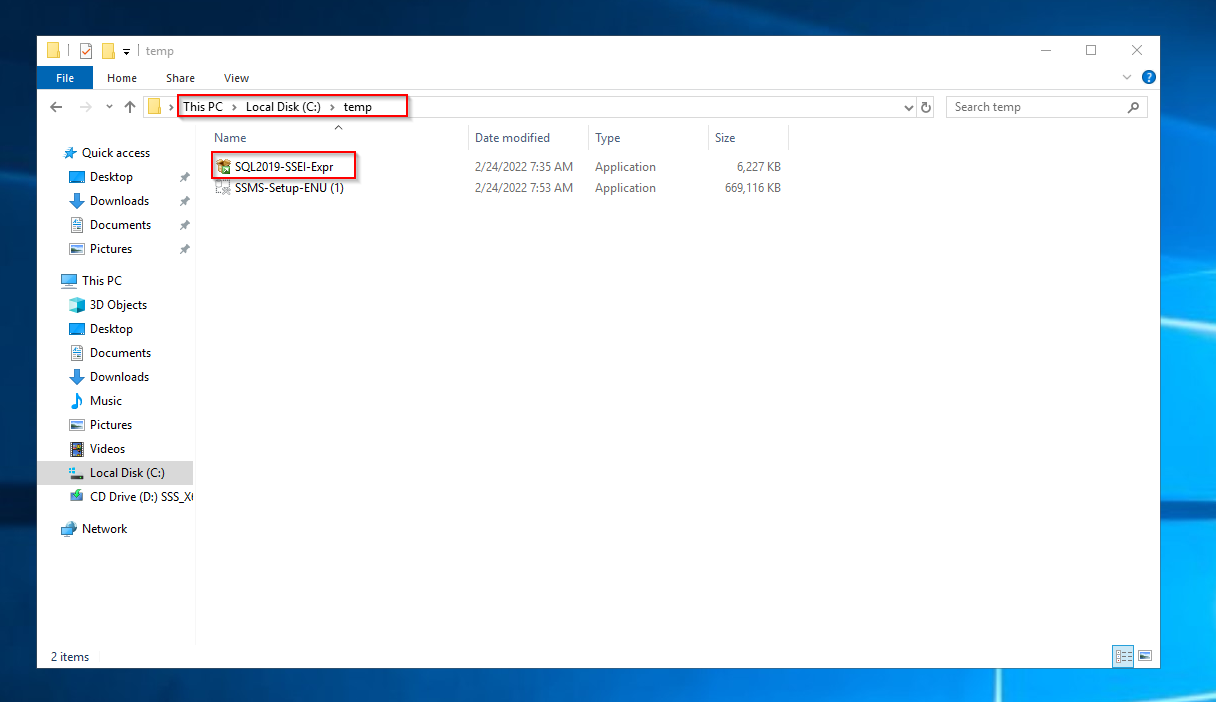
You will then select the SQL2019-SSEI-Expr application and double click it.
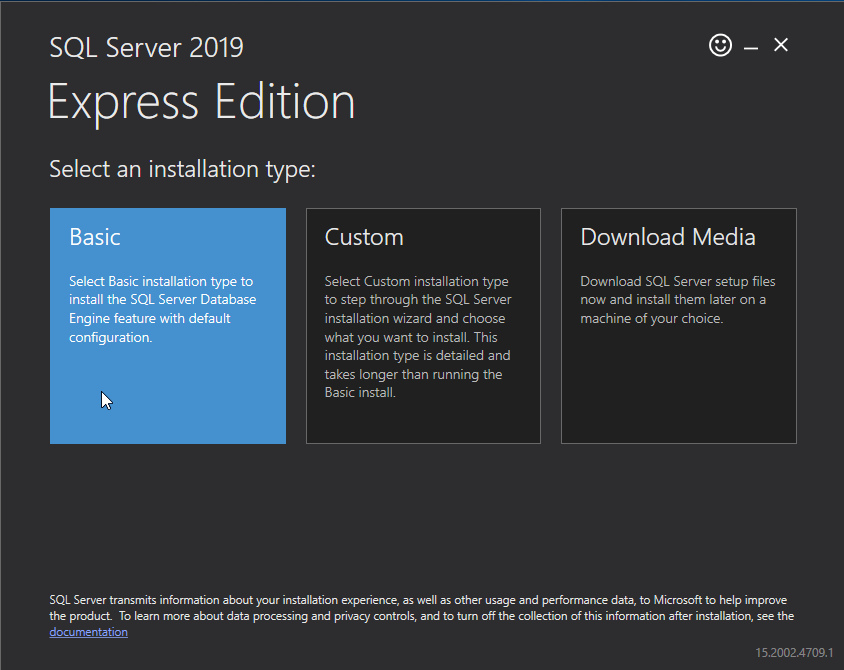
Selecting the Installation Type
Please select the Basic installation option.
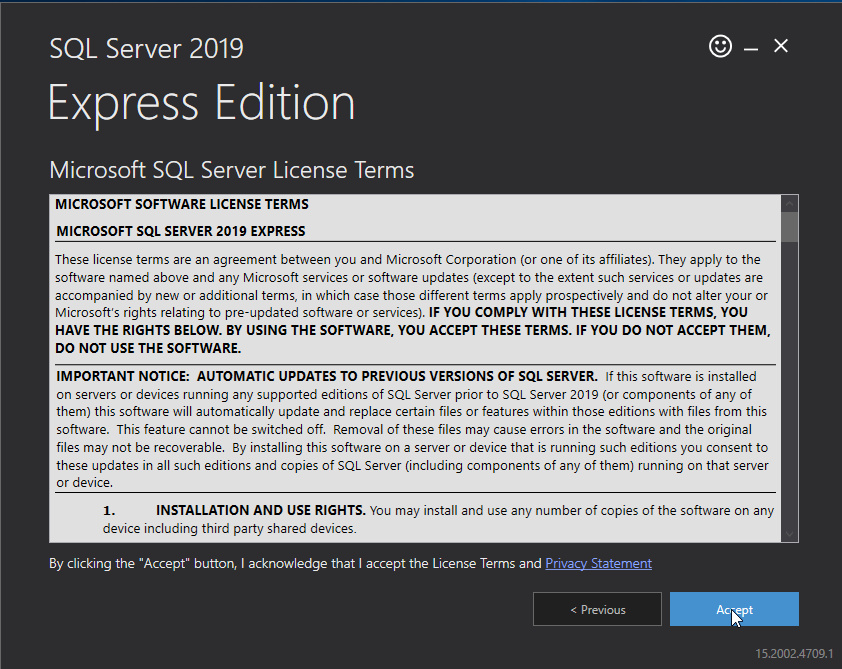
Accepting the Server License Terms
Accept the Microsoft SQL Server License Terms by selecting Accept at the bottom.
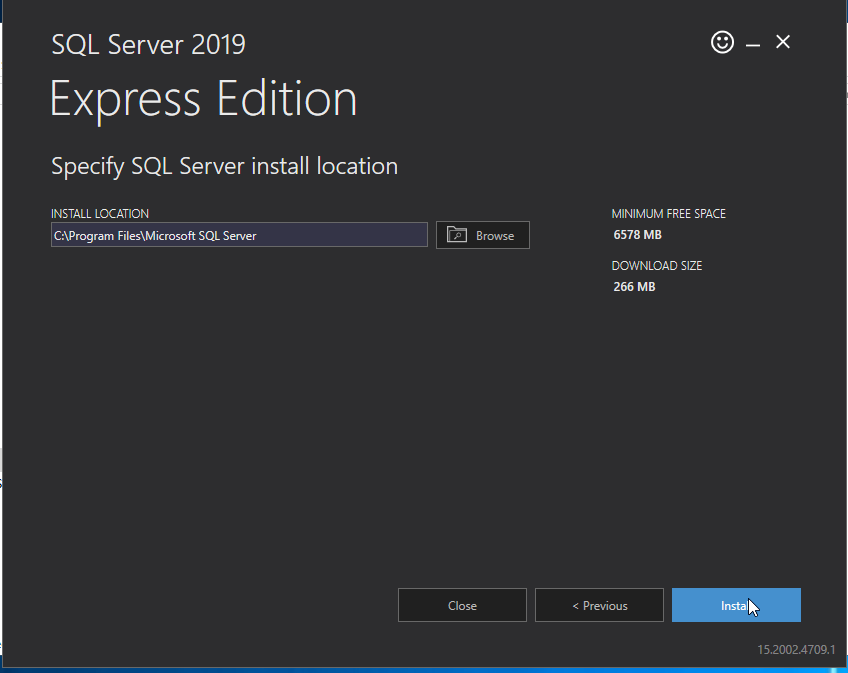
Selecting the Installation Location
Unless otherwise instructed by your supervisor allow the default installation location to be used and select Install.
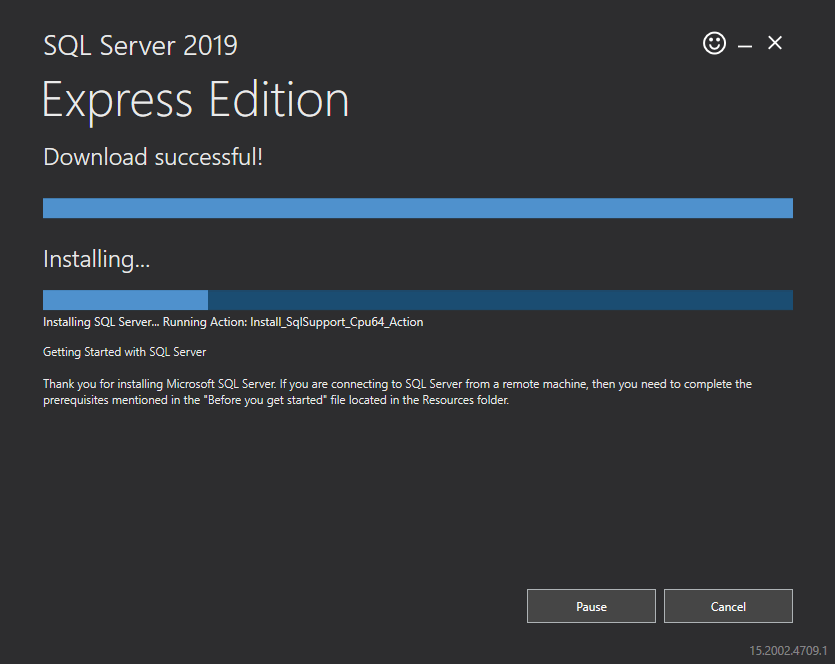
The Installation
The installer will then download the files needed for installation.
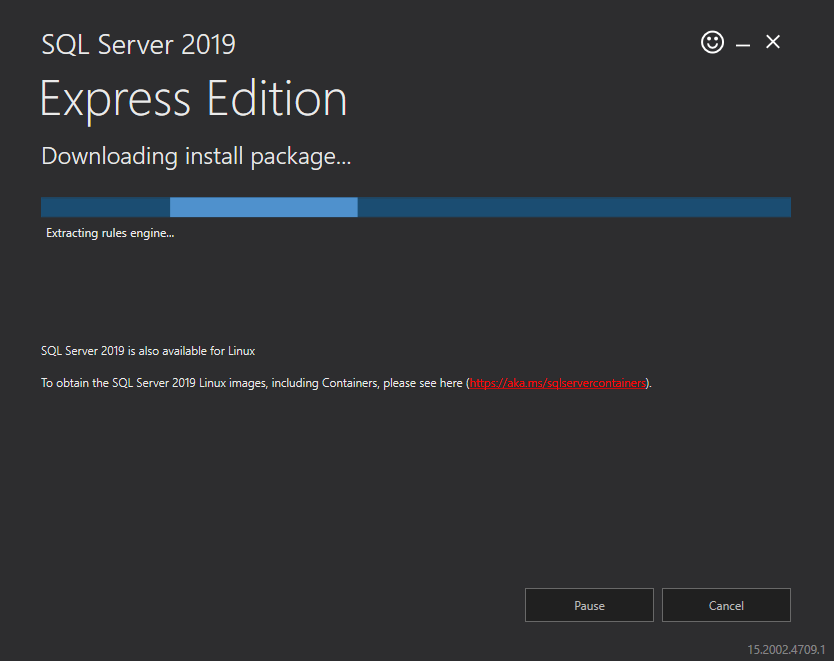
After downloading the installation files the installation will begin.
NOTE: This could take several minutes.
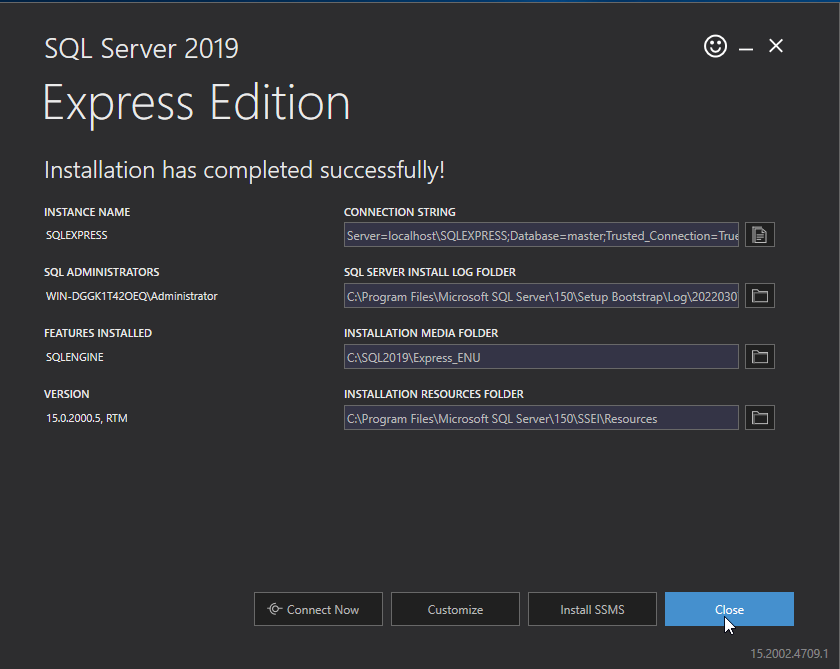
Finishing the Installation
Once the installation is complete Close the installer.
Microsoft SQL Management Studio Deployment Guide
Finding the Installer
To begin this installation please navigate to the File Explorer on the server in question by either selecting the File Explorer icon on the Task Bar as shown below:
Or by right clicking the Start Menu (Windows icon) on the task bar as shown below:
You will then need to navigate to This PC (Found in the Quick Access Menu on the left in the File Explorer) > Local Disk (C:) >temp
Or C:\temp.
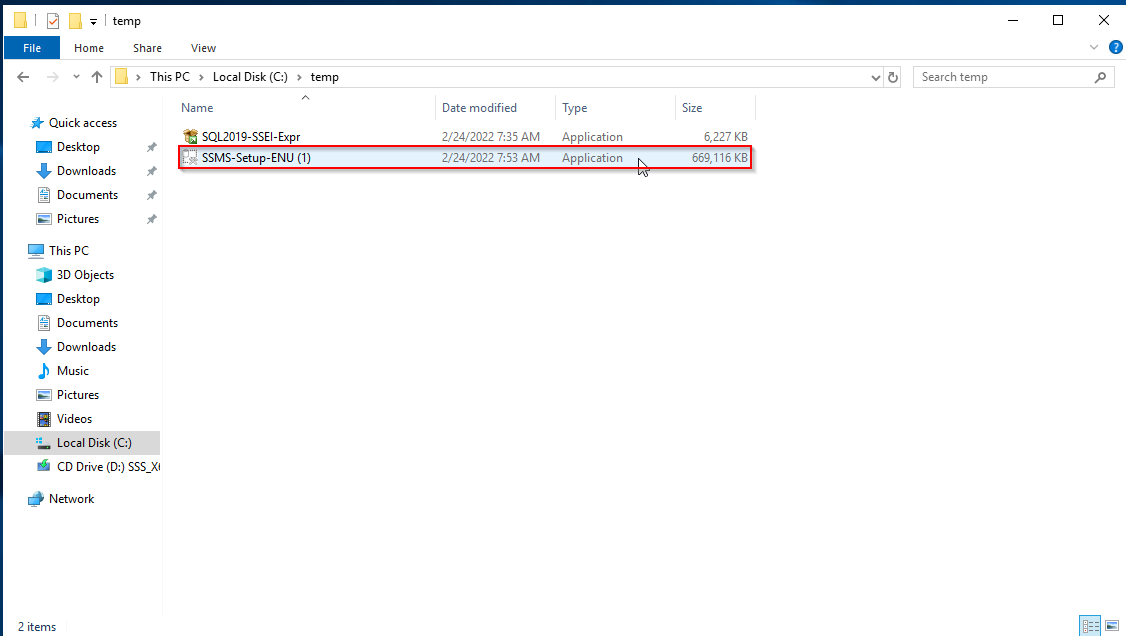
You will then need to select the SMSS-Setup-ENU application and double click it.
Selecting the Installation Location
Unless other wise instructed by your supervisor, install in the default location.
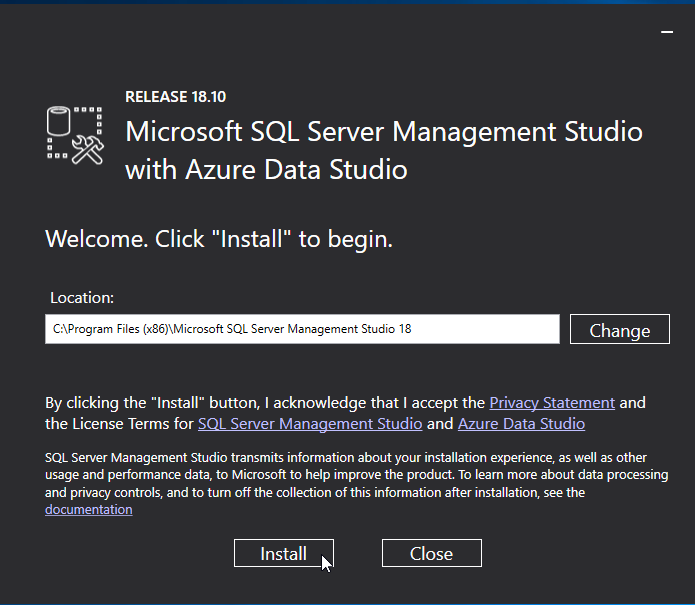
Once the intended installation location has been selected select Install.
The Installation
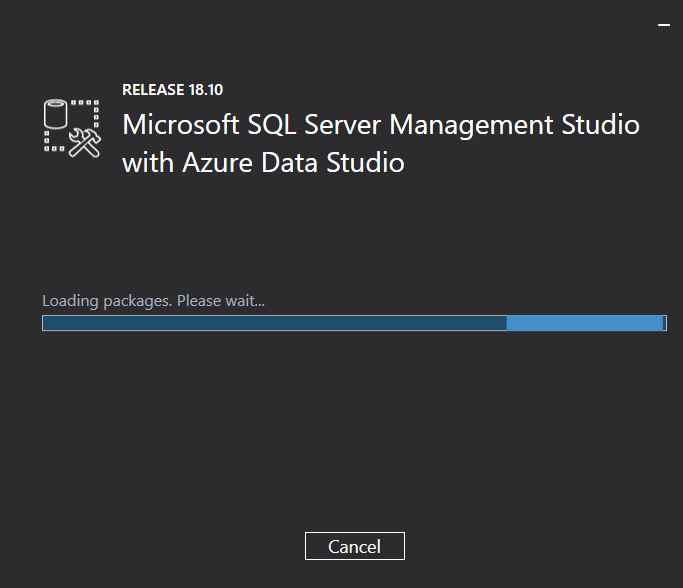
The installation has two phases, loading the packages and installing the packages.
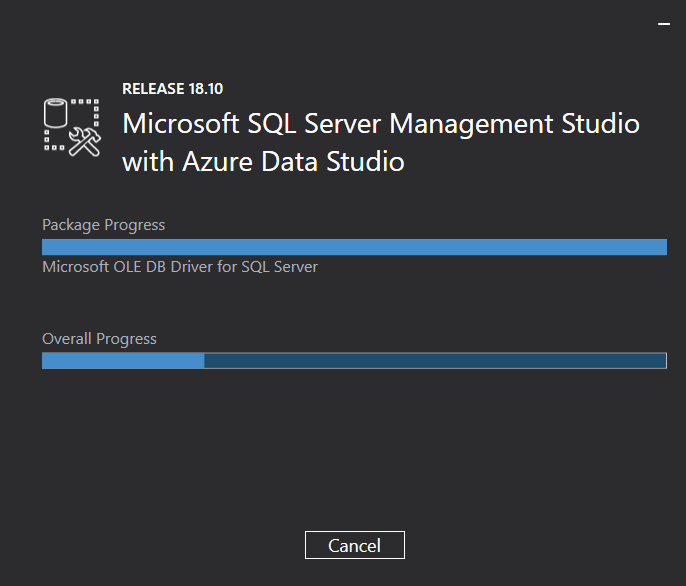
NOTE: This may take a few minutes.
Finishing the Installation
Once the installation is finished, you will need to restart the server which can be done through the installer.

Locating the Microsoft SQL Server Management Studio
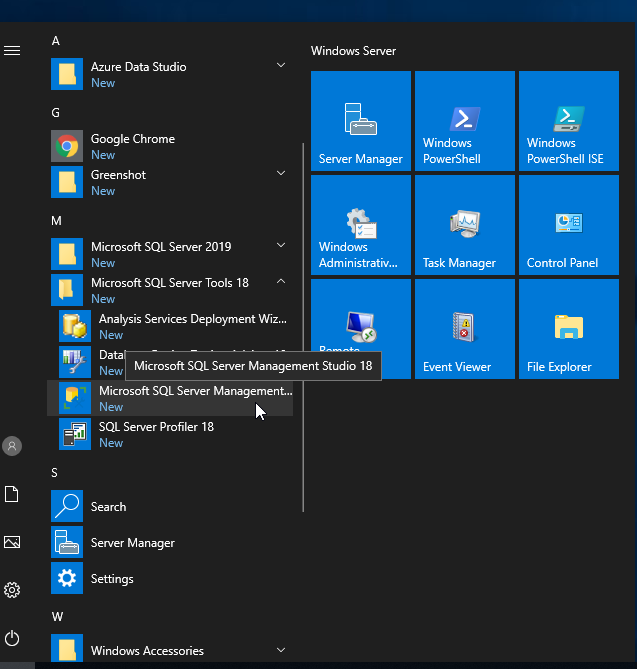
After restarting the server you can open the Microsoft SQL Server Management Studio by clicking on the start menu and navigating to the M section and selecting it.
RabbitMQ Deployment Guide
There are several ways to deploy RabbitMQ, in this guide we will focus on the Choclatey method, as it is the most reliable and fastest.
Install using Choclatey
After installing chocolatey, Open a powershell prompt and type the following command
choco install rabbitmqThis command will fully install RabbitMQ and all required software, once the script is complete you can continue to the RabbitMQ Configuration guide.
Deploying the Relay Controller without Docker
In this guide we will install the McTech RTLS Relay Controller software as a Windows service, not using Docker or Docker compose.
Required Software:
- Windows Server 2019 or later
- .NET Core 6
- Working MyChild6/StaffWatch6/AssetWatch6/WanderWatch6 Install
Downloading Deployment Package
When you are ready to begin deploying the Relay Controller software, you should being by downloading the Release Software from the ftp server, it should be with the MyChild6 releases and should be named something like `McTech.RelayController.<Version>.zip`
File Deployment:
For purposes of this guide, we will assume you have downloaded the .zip file from the last step in c:\temp on the target system.
Follow these steps
- Start by unpacking the zip file
- Create a new folder at C:\Program Files\McRoberts Technologies\McTech_RelayController
- Copy the files from C:\temp\<Name_Of_Folder from step 1> into the newly created folder in step 2
Once completed, you have now successfully installed the McTech Relay Controller software, next we want to create a windows service to automatically start the software when the computer boots, to do this, run the install-service.ps1 file that should be in the same folder as the files copied from the zip folder.
Now that the Relay Controller has been installed & a windows service created, follow the steps in the Configuration Guide to get it all setup and running.
Installing the MyChild6 Desktop Application
The MyChild6 Desktop application allows user to view the MyChild6 Application without using a browser. It also gives the user the ability to setup & configure a 'kiosk' type account which automatically logs in to the application. It also allows for MyChild6 Alarms to be displayed in windows notification pop-ups alongside the main web-based software.
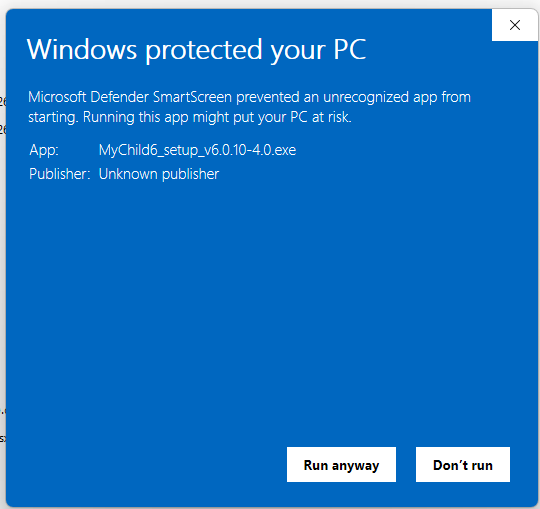
To begin installing the MyChidl6 Desktop application, download the installer from the Releases Repository or the McRoberts Public FTP.

Once you have downloaded the installer, double click and the install should begin. If you are prompted that the application is unsigned, simply click 'Run anyway' and the install will start.
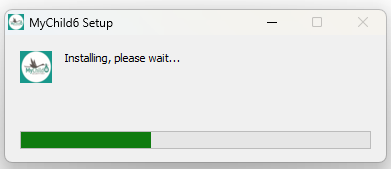
Once the install starts you should see a progress bar like this:
Once the install completes, the application will be started and the initial configuration screen should be displayed, it will look like this:

In the box under URL, enter your unique link to access MyChild6 via web.
Example: https://dev.mychildcloud.com and click "Save and Restart".
The application will restart and the MyChild6 application should be displayed upon restart.
Configuration
Microsoft SQL Server Configuration
Now that you have successfully installed Microsoft SQL Server, we will need to enable SQL logins and create a user account for the MyChild6 software to use.
Enable SQL Logins
Follow these steps to enable SQL Logins
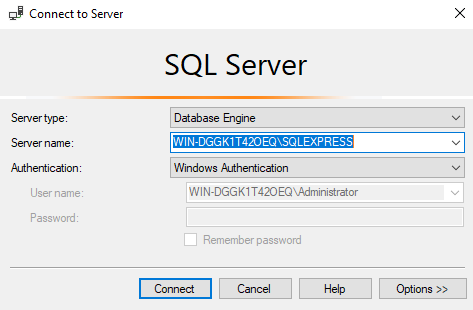
- Launch the SQL Management studio

- Connect to the SQL Server instance (typically localhost\sqlexpress if using SQL express)

- Once connected, locate the "Object Explorer" pane (on the left)
- Right click on the SQL Server (Should be the top level object, with the same name as the server)
- Click Properties on the popup menu

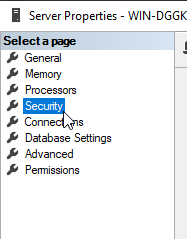
- When the "Server Properties" window opens, locate the "Select a page" section (upper left corner)
- Select "Security" from the "Select a page" section

- Ensure the radio button next to "SQL Server and Windows Authentication mode" is selected
- Click OK


Next you will need to restart the SQL Server for the changes to take effect, to restart the SQL Server, follow these steps
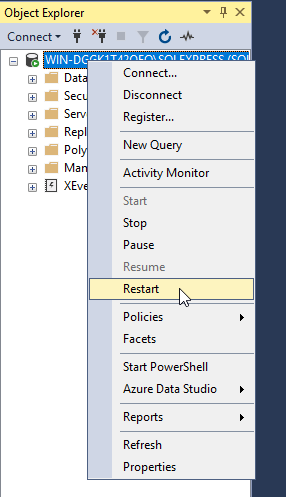
- Locate the "Object Explorer" pane (on the left)
- Right click on the SQL Server (Should be the top level object, with the same name as the server)

- Click "Restart"
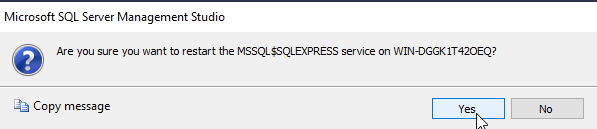
- Click "Yes" on the confirmation popup

You have now successfully enabled SQL Server logins. Next we will Add a new user account.
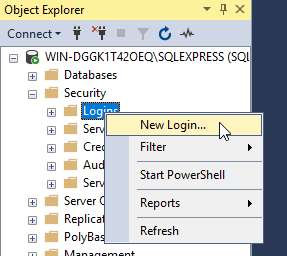
Create a new SQL User account
We need to create an SQL user account that the MyChild6 software can use to communicate with the database server, we will be using the SQL Management studio, Follow these steps
- Login to the SQL Server
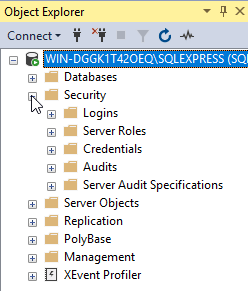
- Using the Object Explorer, Expand the "Security" folder.

- Right click on the folder labeled "Logins"

- Click "New Login" from the popup menu
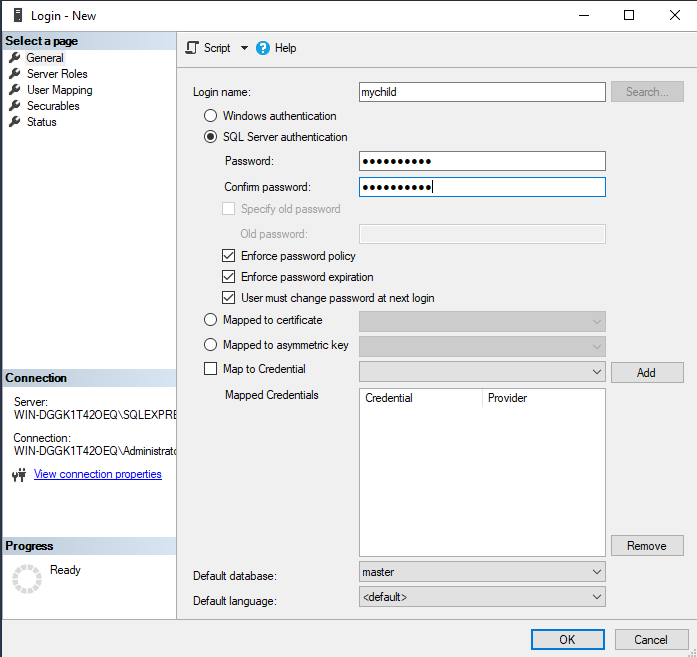
Once the "Login - New" window opens, follow these steps to create the user account
- Enter a name for the user (We recommend mychild)

- Select the radio button next to "SQL Server authentication"
- Enter a password and Confirm password for this account (Note: please avoid using $ and , as special characters!)
- Uncheck the boxes for "Enforce password policy" which should disable the next 2 checkboxes as well

- Locate the "Select a page" section in the upper left corner and select the "Server Roles" page

- On the "Server Roles" page, check the box next to "dbcreator"

- Click "OK"


You have now successfully created a user account on your SQL Server.
Please proceed to the Minio Configuration Guide for next steps.
RabbitMQ Configuration Guide
Now that RabbitMQ is configured and running, we will need to perform the following tasks
- Update configuration
- Create a vhost
- Create a user account
Update Configuration
The default RabbitMQ configuration will work if you are doing development and/or testing. For production usage, it is highly recommended to update the configuration as we outline here. Follow these steps
- Open File explorer
- Click in the Address bar at the top of the File Explorer and type %APPDATA% and press Enter
- Locate the "RabbitMQ" directory and double click on it
Now that we are inside the RabbitMQ configuration folder, we should see that there is no rabbitmq.conf file, we need to create one. Follow these steps to create the file
- Open notepad
Once notepad is open, we need to set a couple configuration settings, you can copy/paste these settings directly into the notepad window.
loopback_users.guest = false
listeners.tcp.default = 5672
default_pass = CHANGEME
default_user = admin
hipe_compile = false
management.listener.port = 15672
management.listener.ssl = false
Be sure to change the default_pass to a secure password!
- Next, go to File and click "Save"
- Set the name to rabbitmq.conf
- Change the "Save as type" dropdown to "All files"
- Click "Save"
Next look for a file named "enabled_plugins", it should be in the same folder as the rabbitmq.conf file. If the does not exist, we will need to create it. Open a new notepad file and add following
[rabbitmq_management,rabbitmq_mqtt].Make sure to include both brackets [ ] as well as the Period .
- Next, go to File and click "Save"
- Set the name to enabled_plugins
- Change the "Save as type" dropdown to "All files"
- Click "Save"
The last step in updating the configuration is to restart the RabbitMQ service. Follow these steps
- Goto Start and click "Windows Administrative Tools"
- In the "Administrative Tools" window, locate "Services" and double click on it
- In the "Services" window, locate the "RabbitMQ" service in the list
- Once located, Right click on the service and click "Restart"
It can take up to 5 minutes before the server is available after the first startup!
Congratulations, RabbitMQ is now configured!
Note: Sometimes the RabbitMQ Service will auto-start after installation before the rabbitmq.conf file can be created, when this happens the default username & default password are never set. To correct this issue, stop the RabbitMQ service and delete the "db" folder located in the RabbitMQ Data folder (IE: %APPDATA%\RabbitMQ\db), then restart the service, the default user & password should now work.
Create a vhost
Next we need to create Virtual Host for the MyChild6 software to use. To do this we will be using the RabbitMQ Management Ui, this is typically located at HTTP://localhost:15672 Follow these steps
This assumes that RabbitMQ is installed on the same computer you are working on.
If McTech Wireless Receivers have been pre-programmed to communicate with the McLinkAgent, you MUST ensure that the same vHost is used on both the Wireless Receiver AND the MyChild6 Web server, typically in this sceneiro we would use the default / vHost and create a dedicated user with a password of 30 characters or less.
- Open a web browser (Microsoft Edge or Google Chrome are recommended)
- Browse to the Management Ui (HTTP://localhost:15672)
- Enter your username & password we configured in the last step and login
Once you are logged in, you should see an Overview page with a couple of graphs and a ton of information. We need to go to the Administration section. Follow these steps
- At the top of the page, locate the tab named "Admin" and click on it
- On the right side of the page, locate "Virtual Hosts" (it's bold!) and click on it
If all went well, you should be viewing the "Virtual Hosts" page. Near the center of the screen shoutl be a list of hosts, there should only be one listed with the "Name" of "/" and the "Add a new virtual host" dropdown should be expanded. Follow these steps
- Enter a name for your virtual host ( We recommend MyChild6 )
- Enter a description (Optional)
- Enter tags (Optional)
- Click the "Add virtual host" button
After clicking save, the list should be updated and your new virtual host should be listed with a state of "running".
Congratulations, You have successfully created a vhost (Virtual Host).
Create User Account
Next we need to create a User account for the MyChild6 software to use. Follow these steps
- Locate "Users" on the top right side of the screen (its BOLD) and click on it
- You should see a list of user accounts, with only "guest" being listed
- Locate the "Add a user" section (near the bottom)
- Enter a username (We recommend mychild6)
- Enter a password (Note: do not use $ or , in your password!)
- Click "Add user"
After clicking "Add user" your new user account should be listed in the list near the center of the page. We need to set permissions for our user account. Follow these steps
Click on the name of your new account from the list
You should now see a big yellow banner saying your user does not have permissions, as well as several places to set different permissions. Locate the section labeled "Permissions" and then locate the section "Set permission". Once located follow these steps
- Set the "Virtual Host" to the virtual host we created in (Create Virtual Host)
- Leave Configure regexp at default
- Leave Write regexp at default
- Leave Read regexp at default
- Click "Set Permssion"
After clicking "Set permission" the yellow banner should disappear and a new list should be displayed under the header "Current permissions". The permissions should be set for the Virtal Host you created.
The above steps assume you are already logged into the RabbitMQ Management Ui
Congratulations. RabbitMQ is now configured and ready! Continue on to the Minio Configuration Guide
Web Configuration
In this guide we will outline all of the settings available in the appsettings.json for the MyChild6.Web software (primary server)
all configuration variables listed in the appsettings.json can also be defined in your environment variables
AllowedHosts
This value tells the software what computers are allowed to connect. This should ways be a * (allow all)
Default Value: *
Urls
Urls controls what Url's the software listens on, typically this should be left at the default value
Default Value: http://*:9982
When deploying on-premise, you want to set the url to http://*:80 so that users can view MyChild6 by browsing to http://servername instead of being required to enter a specific port (IE: http://servername:9982)
Credentials
- Username
- This is the username used for the administrator account
- Default Value: admin@mychildcloud.com
- Password
-
- This is the password for the administrator account
- Default Password <redacted>
-
ConnectionStrings
- DefaultConnection
- This is the connection string for our SQL database
As of v6.0.6-SP4 there are now scripts included with the release zip to help generate the sql connection string. check the helper_scripts folder for the "generate_sql_connstring.bat" script!
AWS
- Region: us-east-1,
- This should almost always be left at the default value
- ServiceURL
- The ServiceURL is the URL to the Minio install
- ForcePathStyle: true,
- The ForcePathStyle should always be left to true
- AWS_ACCESS_KEY_ID
- This is your Minio Access Key
- Default Value: MyChild6
- This is your Minio Access Key
- AWS_SECRET_ACCESS_KEY
- This is your secret key for your Access Key
- Default Password<redacted>
- This is your secret key for your Access Key
As of v6.0.4 AWS Integration is no longer used. This section can be omitted
JWT
- Secret
- The JWT Secret value is used to help generate JWT Tokens for API auth.
- When generating a secret, try to use a minimum of 45 characters, upper, lower, and numbers. No Special characters
- Key
- The JWT Key is the key used for generating and verifying tokens.
- When generating a key, try to use a minimum of 20 characters, upper, lower and numbers. No Special characters
- Issuer: http://localhost:9982/
- The Issuer should always be the hostname and port the software is running on, leave this as the default value unless you know what you are doing!
As of v6.0.6-SP4 there are now scripts included with the release zip to help generate the JWT values. check the helper_scripts folder for the "generate_jwt_secret" script!
SSO (AzureAD)
- The SSO section is an "array" as denoted by the [ ] as the starting brackets instead of { }, so we can have multiple domains by simply including more SSO {} sections, Each section requires each of the following to be set
- DisplayName
- This is the text that will be displayed on the main login screen
- Domain
- This is the domain that will be used by users logging in (IE: mychildcloud.com)
- ClientId
- This is a unique value provided by the customers IT department
- TenantId
- This is a unique value provided by the customers IT department
- OidcScheme
- follow the example given, this must just be uniqe and not repeating, the base example is "oidc-mctech" so if your facility is named "UserHospitalOne" you might set the value to "oidc-uho". Note: this value MUST be all lower-case and must only include a-z and dash ( - ) characters!!
- CallbackPath
- Leave this as the default value of "/signin-oidc" unless you know what you are doing!
SendGrid
- ApiKey
- The SendGrid Apikey is used by MyChild6 to send emails and text messages. This replaces the typical SMTP server.
- SandboxMode: false
- SandboxMode should only be set to true if you are testing or developing the MyChild6 software, otherwise this should be false
Cache
- CacheConnStr
- The CacheConnStr should be the URL to your Redis memory cache cluster. this is typically a URL
- InstanceName
- The instance name specified here is used to prefix all key's used by MyChild6.
EventBus
- EventBusConnection
- Port
- EventBusUseSSL
- EventBusVirtualHost
- EventBusUserName
- EventBusPassword
- SubscriptionClientName
- This value is not really used for anything for the MyChild6 Web server, however it is VITIALLY important for the McLinkAgent Service. When configuring the McLink Agent service you *MUST* set this value to the "McLinkAgentId" value for the facility the agent will be providing data for.
- To Find the McLinkAgentId: Login to the MyChild6 Software and browse to the System Admin section, Once in the System Administration section, browse to the Facility list. The AgentId is listed for each facility available and should be *UNIQUE* per facility!
- Default Value: DefaultFacility (case-sensentive)
- This value is not really used for anything for the MyChild6 Web server, however it is VITIALLY important for the McLinkAgent Service. When configuring the McLink Agent service you *MUST* set this value to the "McLinkAgentId" value for the facility the agent will be providing data for.
Entries that are Bold are Required.
Sentry
- Dsn
- SendDefaultPii: false
- MinimumBreadcrumbLevel: Debug
- MinimumEventLevel: Warning
- AttachStackTrace: true
- Debug: false
- DiagnosticsLevel: Error
InfluxDB
- Enabled: false
- InfluxHost
- InfluxBucket
- InfluxOrg
- Token
Logging
- LogLevel
- Default: Information,
- Microsoft: Warning,
- Microsoft.Hosting.Lifetime: Information,
- Quartz: Warning
McLinkAgent Configuration
The McLinkAgent is used for several different purposes. The main purpose is as a communication "gateway" between Wired RS485 devices and the MyChild6 Web Server. The McLink Agent can also act as an OTA(Over The Air) server for McPlug devices as well as managing some of the servers local services (Time, MessageBus etc), in this guide we will focus on the default deployment, which covers handling communications for Wired devices as well as OTA duties.
All configuration variables listed in the appsettings.json can also be defined in your environment variables
AllowedHosts
This value tells the software what computers are allowed to connect. This should ways be a * (allow all)
Default Value: *
Urls
Urls controls what Url's the software listens on, typically this should be left at the default value, by default McPlugs will automatically search for OTA on port 5151, while port 9880 is used for the UI and API.
Default Value: http://*:9880;http://*:5151
API Base URL
This should be the url of the MyChild6 API assuming you have deployed the MyChild6 Web server on the same server, API url might look something like `http://localhost/api/` when entering your ApiBaseUrl value
Make sure that your ApiBaseUrl ALWAYS ends with api/ (IE: http://localhost/api/) the slashes are very important to ensure that the api is called correctly
Credentials
- Username
- This is the username used for the MyChild administrator account
- Default Value: admin@mychildcloud.com
- Password
-
- This is the password for the administrator account
- Default Password <redacted>
-
We recommend creating a dedicated user for the McLinkAgent to use for communications, instead of using the administrative account. To do this, you would simply create a normal user account with IT Admin permissions to view all of the backend-objects (IE: departments, floors, networks etc.)
API Credentials
- Username
- This is the username used for the MyChild administrator account
- Default Value: admin@mychildcloud.com
- Password
-
- This is the password for the administrator account
- Default Password <redacted>
-
The Api Credentials section are separate from the Credentials section above. The Api Credentials are actually used for communications with the Firmware Master API Server. These credentials should be provided by the Development team before deployment beings
EventBus
Entries that are Bold are Required.
For on premise installations this information is local (ie: localhost). If this is a cloud installation the information is provided by Brad Davis.
- EventBusConnection
- Port
- EventBusUseSSL
- EventBusVirtualHost
- EventBusUserName
- EventBusPassword
- SubscriptionClientName
- When configuring the McLink Agent service you *MUST* set this value to the "McLinkAgentId" value for the facility the agent will be providing data for.
- To Find the McLinkAgentId: Login to the MyChild6 Software and browse to the System Admin section, Once in the System Administration section, browse to the Facility list. The AgentId is listed for each facility available and should be *UNIQUE* per facility!
- Default Value: DefaultFacility (case-sensentive)
- When configuring the McLink Agent service you *MUST* set this value to the "McLinkAgentId" value for the facility the agent will be providing data for.
Simulator Configuration
Relay Controller Application Settings Guide
The McTech Relay Controller software is primarily used to monitor running deployments of MyChild6/StaffWatch6/AssetWatch6/WanderWatch6 for specific alarms that the user can select, once an alarm has been detected the Relay Controller software can then activate specific relays based on user needs.
After installing the Relay Controller software, you can use this guide to update the appsettings.json file with the correct information to communicate with your install of the MC6/SW6/AW6/WW6 software
RelayDeviceRepositoryStorage
This setting controls where the RelayDevice configurations are stored, this setting should not be changed.
RelayRepositoryStorage
This setting controls where the Relay Configurations are stored, this setting should not be changed.
SeqServer Settings
- URL:
- The SeqServer block allows you to configure a Seq server for the Relay Controller to transmit logs to, if you are unsure how to set this value, leave it as the default of `http://localhost:5341/`
- ApiKey:
- This is the API key that will be used to communicate with the Seq Server, if your Seq Server does not need an API key, you can leave this as a blank string
Cache Settings
- CacheConnStr:
- This is the URL for your Redis server or Redis Cluster, if you are not using a Redis server or Cluster, leave this value as it's default (Default: Blank string
- InstanceName:
- This is just a unique instance name for your redis server, your Redis administrator should provide this, if not leave this as it's default value of [MC6]-
EventBus Settings
The EventBus settings should be same settings used when deploying the MC6/SW6/AW6/WW6 software, the only changes you should really make are
- SubscriptionClientName:
- Set this to something unique to help you identify it later, or leave it as the default "MC6_RelayController"
Logging Settings
The logging settings should be left at thier default values. If you need more debugging information you can set the System and Microsoft values to "Debug", but be warned, this will produce A LOT of output.
Relay Controller Adding Relays and Rules
In this guide we will focus on adding relays and alarm rules to the McTech Relay Controller software that you setup in the previous guide. This guide assumes that you have already deployed the Relay Controller software and have it setup to listen on http port 5001
Adding Relays:
The first step in setting up the Relay Controller is to add relays to the software, currently the Relay Control software supports most of the Control By Web brand relays, with the 4-port relay being the most common / recommended relay. Follow these steps.
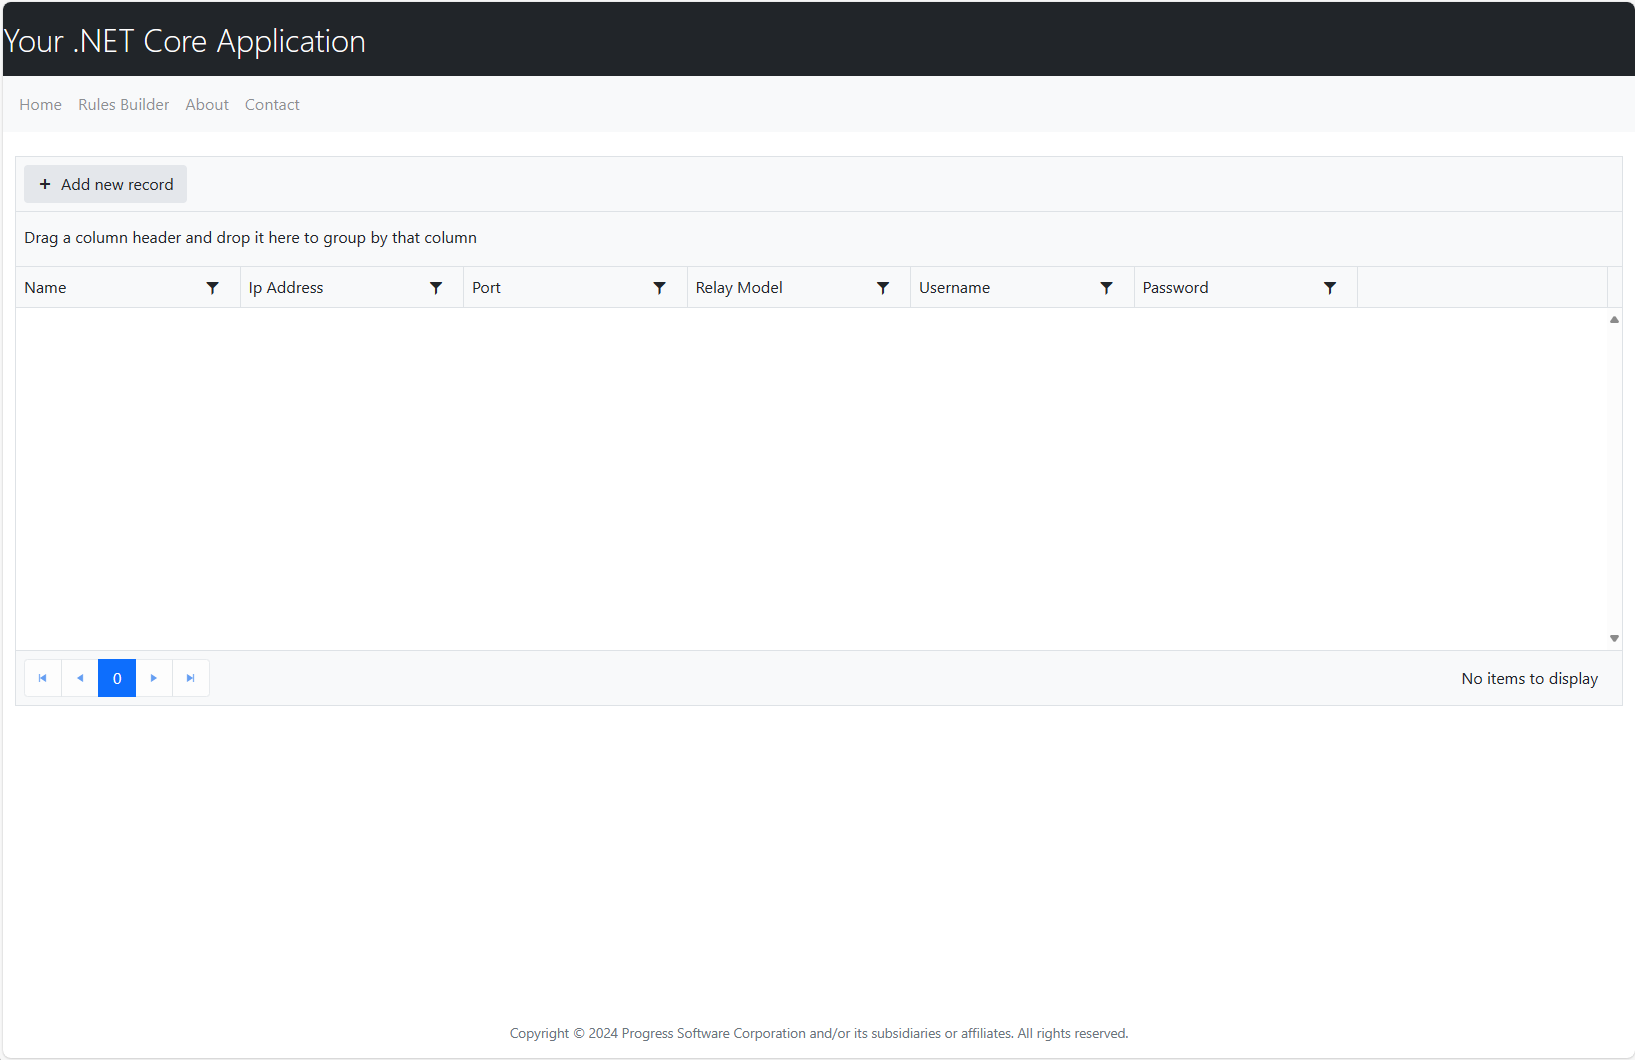
- Open a web browser and browse to http://<server ip or hostname>:5001
- Once the dashboard loads (See example 1) click "Add new Record"
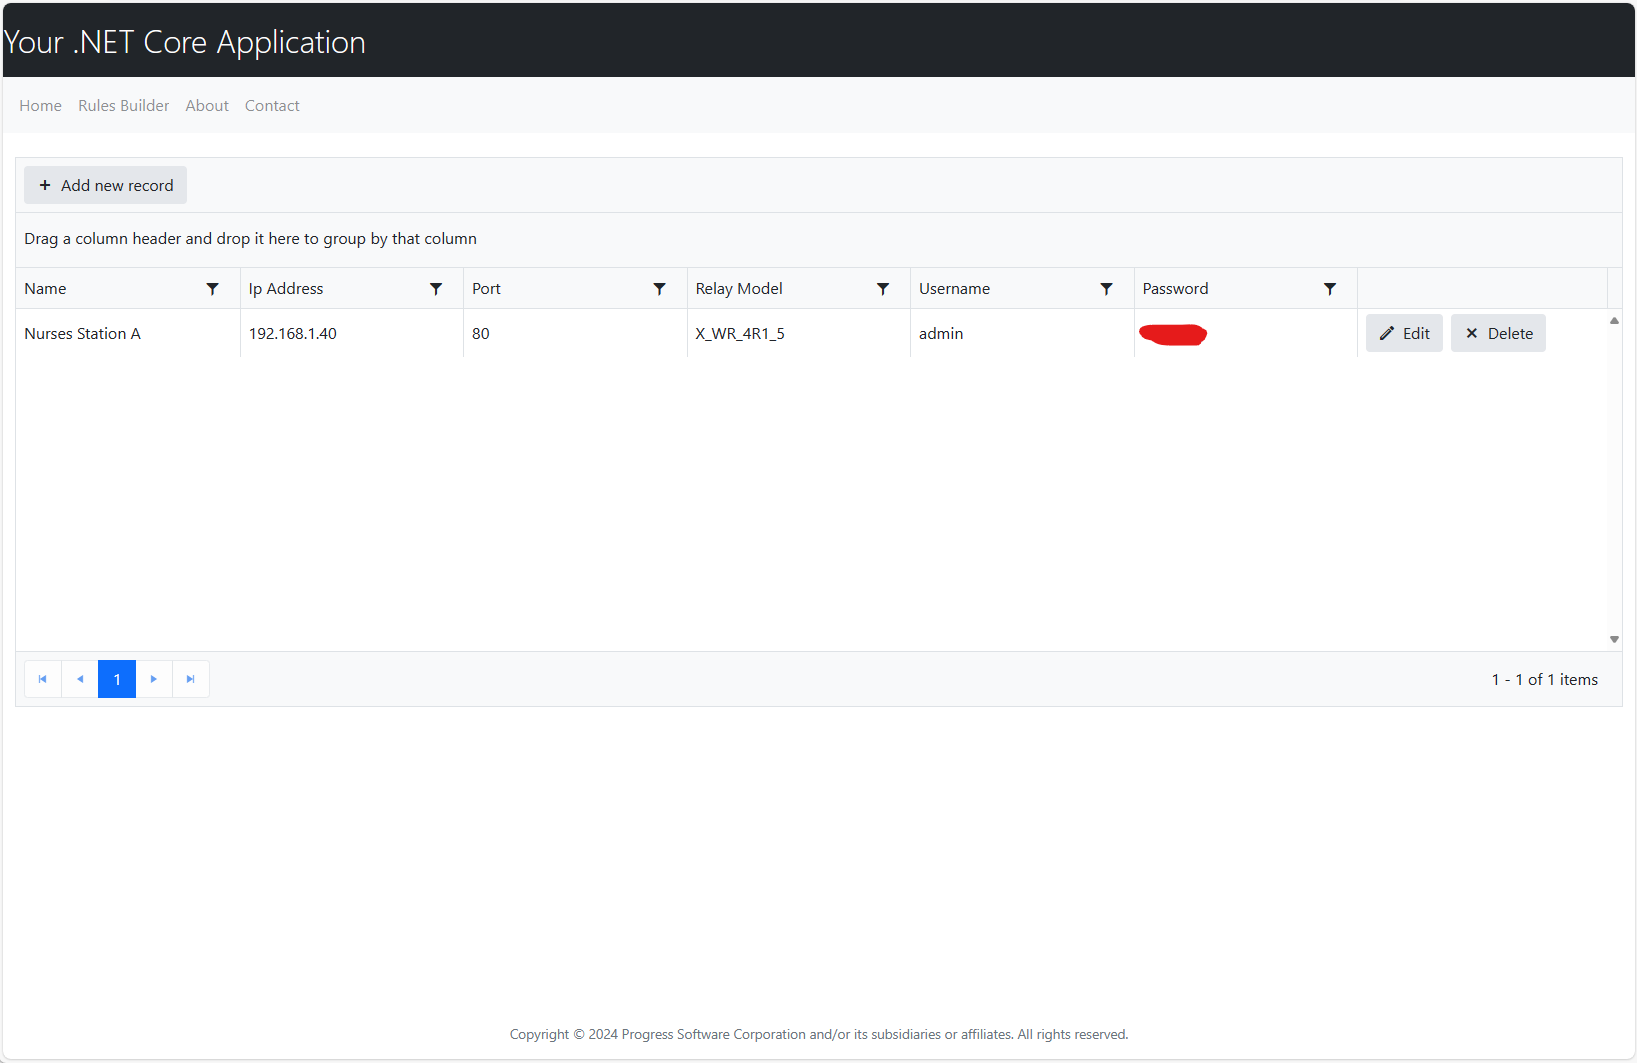
- Insert all of the required information
- Note: the Name column is a supposed to be a unique name for the relay device itself, for example "Nurses Station 1"
- After filling out the required fields, save the entry and you should see the new entry listed (See example 2)
Once you have all of your relay devices added, you can move on to creating rules for when to activate the relays. to do this, click on "Rules Builder" at the top of the page, a page similar to this should be displayed
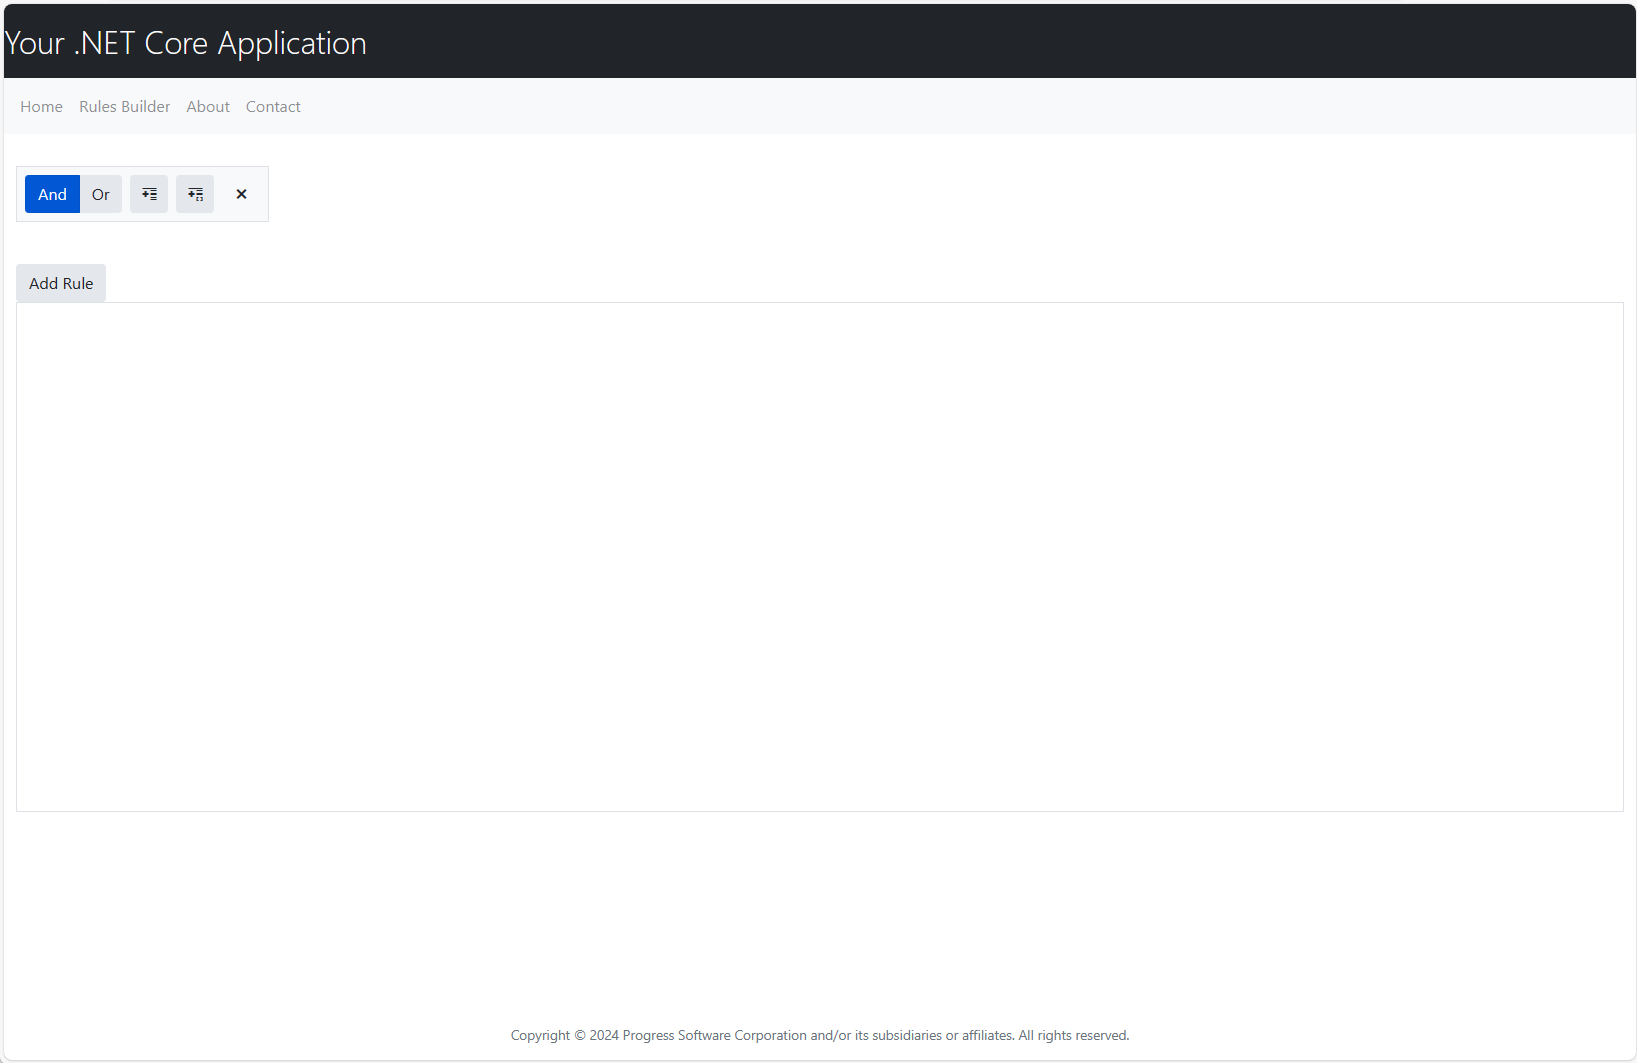
This is the Rules builder page, to create a new rule, simply click the "Add Rule" button, a popup should open asking for more information

When creating a new rule, all fields are required except the "From Device" field, if this field is left blank then the software will activate this rule anytime the selected alarm is received.
If you device to populate the "From Device" textbox, make sure to enter the serial number of the device that should trigger this rule, for example if you have a door at nurses station B with a serial number of 123456, you would simply enter "123456" in the "From Device" text box
Once you have created all of your rules, you can begin testing the integration by raising alarms in any of the supported products (MC6/SW6/AW6/WW6) and your relays should activate based on the rules you have configured.
Configure Nginx as SSL Reverse Proxy
Configuring Nginx on windows, using Pfx Files
- Install Chocolatey (if not installed already)
- Install OpenSSL
- Command:
choco install openssl
- Command:
- Install Nginx
- Command:
choco install nginx --params '"/installLocation:C:\Program Files\McRoberts Technologies\McTechProxy /serviceName:McTechProxy"'
- Command:
- Copy the SSL Certificate PFX file to an easy to access location (C:\temp works for now)
- Open the OpenSSL Command prompt (Start > All Programs > OpenSSL > Win64 OpenSSL Command Prompt)
- Navigate to the directory where the pfx file is located (C:\temp) - cd c:\temp
- Extract the SSL Certificate Key from the PFX File
- Command: openssl pkcs12 -in <PFX_file> -nocerts -nodes -out mychild.<domain_name>.key.pem
- Extract the "crt" file from the PFX file
- Command: openssl pkcs12 -in <PFX_file> -clcerts -nokeys -out mychild.<domain_name>.certs.pem
- Copy the *.pem files from the temporary location, to a permnate home
- Recommended Location: C:\Program Files\McRoberts Technologies\McTechProxy\nginx-<version>\conf\ssl
- Edit the nginx.conf in the McTechProxy\conf folder, use Template 1 as an example, changing server_name & certificates locations as needed
# Start of Template 1 - nginx.conf #
##########################
proxy_buffers 4 256k;
proxy_busy_buffers_size 256k;
large_client_header_buffers 4 16k;
# End of Template 1 - nginx.conf #
##########################
MyChild6 Desktop App Configuration
The MyChild6 Desktop application has several configuration options available. To access the configuration settings, follow these instructions.
Start by opening the application. Once open and loaded, Press "Ctrl + F11". This will cause the menu bar to be displayed. From the menu bar, click File & Configuration. See below.
After you click the configuration button, a new popup window should open. See below.
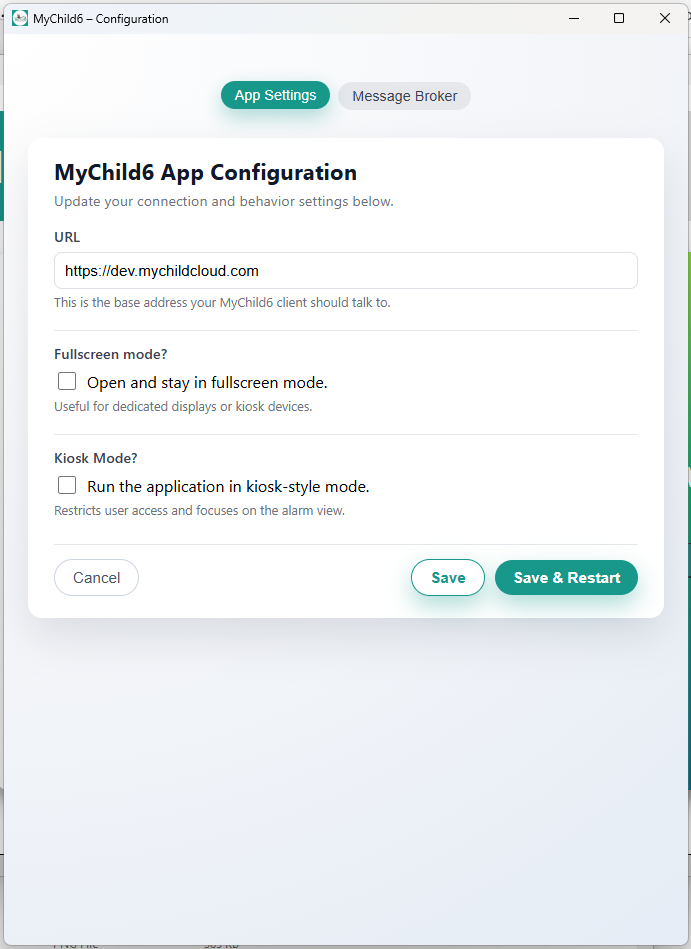
On the App Settings tab you can configure the following:
- URL
- This is the URL for the MyChild6 Application.
- Fullscreen Mode
- When activated, the application will start in full screen and will attempt to remain in front of all other windows.
- Kiosk Mode
- This user account has limited permissions, and is used to monitor the system for alarms.
- Note: you will need a username & password when configuring Kiosk Mode!
The Message Broker tab allows you to configure the application to capture alarm messages directly from the MyChild6 Message Broker and display them as Windows Notifications. This helps to ensure that alarms are not missed.
To configure the Message Queue options, you will need the following information from your MyChild6 System Administrator.
- Message Queue Host (Normally the MyChild6 Server)
- Message Queue Port (Normally 5672)
- Message Queue Username
- Message Queue Password
- Message Queue Vhost
The "Message Queue Client Name" can be set to anything. A good idea would be the name of the computer running the software.
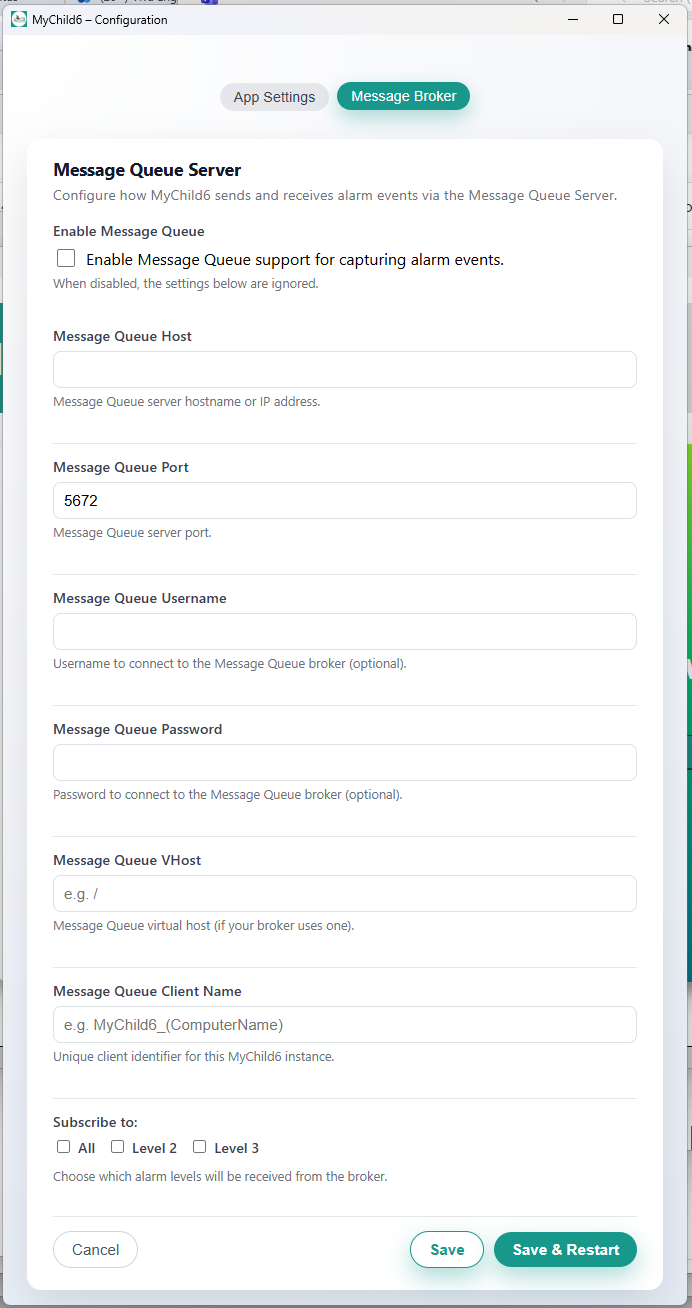
Once you have configured all the options click "Save & Restart".
Updates / Upgrades
Troubleshooting
McLinkAgent won't stay running
Tag In Field (Door Open or Closed) is delayed
RabbitMQ using large amount of hard disk space
Facility Configuration and Set Up
This is where you can find, instructions walkthroughs, tips and tricks to setting up the software and devices to the facilities wants and needs.
Devices - Keypad
Ben Graham submitted this tip for getting the PIN codes to update on the Door Controller:
In MC6 we are required to restart services for Door Controllers to take PIN codes. This was the most likely cause because the PIN codes would not work on any door. I set a PIN to 1876# and tested with that after restarting services and door does work as intended.